How to Use word
A simple guide to help anyone use a simple word processor!
Getting started
Microsoft Word is one of the most commonly used softwares worldwide, whether it be for writing a paper in school, collaborating in the workplace, or creating a personal resume.
Getting started with Microsoft Word can be intimidating at first, which is why we are here to give an easy rundown of Word's most important features and leave you feeling like an expert.
Click on More Info for additional information.
INTRO TO WORD
Opening Word:
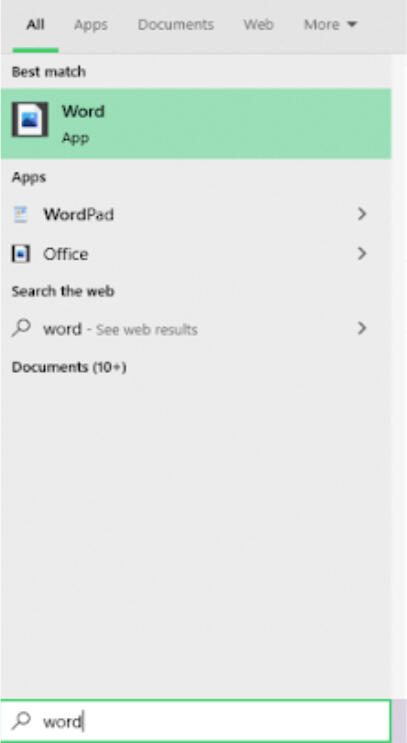
1) To open Word, type “Word” in your system's taskbar.
2) If this does not work, you may need to download the Office app onto your computer. Doing so will allow you to open Word.
Creating a new document:
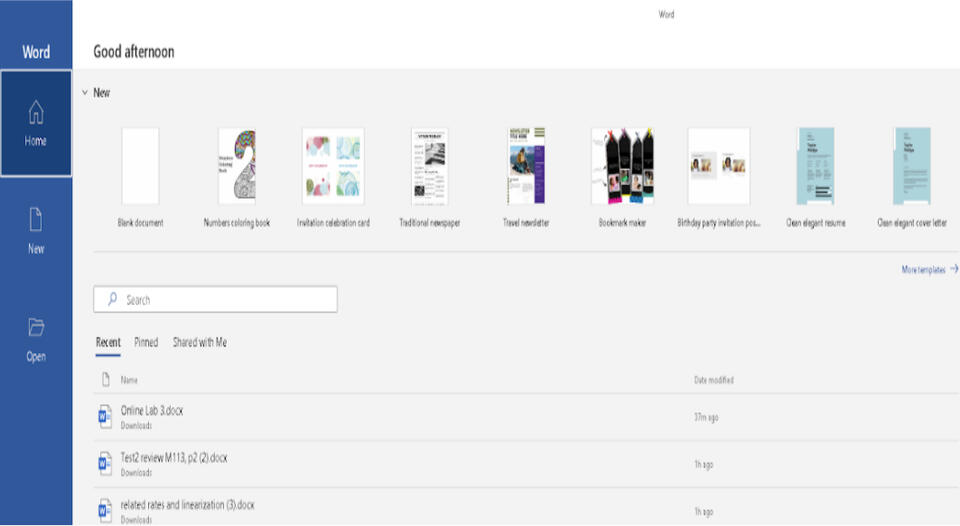
1) After opening Word, you will have three features available to you on the taskbar to the left: “Home”, “New”, and “Open”.
2) If this is your first time on Word, clicking “New” will prompt you to create a new document with many templates to choose from (we will go into how to choose a template later on into the guide).
3) After creating a new template, you will be able to write text and work on your document.
If you have already created documents in Word, the Home bar will centralize your work, giving you ease of access to files you have previously been working on, as well as allowing you to create a new template.
The Open bar’s specialty is finding any piece of work you have previously worked on, allowing you to search your computer's directory for documents.
Saving Files:
While using Word, a good rule of thumb is to constantly save your work as you go. If your system crashes, you may lose all of your work and have to restart. To save your work, go to File and use Save As to save your work in a safe place you can find for later.
HOW TO UTILIZE WORD
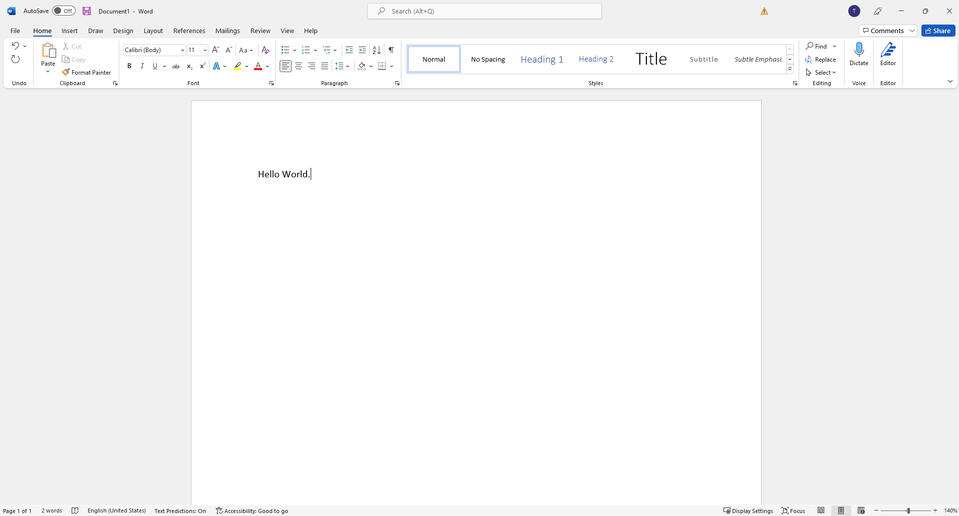
Word Features
Not only can you save manually, but you can use the AutoSave toggle at the top left corner to back up your files to the cloud (that is, OneDrive). Just make sure you’re comfortable leaving the files synced on the computer you’re using, though. If you share that computer, don’t use AutoSave.
Also at the top of the window are the Search Bar and the Ribbon. The Search Bar allows you to search for a command (e.g., Page Break) or for a Help page based on what you type in. The Ribbon is where most of the commands can be found. Here are just some of the tabs and commands you’ll find in it:
Home (Font, Paragraph, Styles)Insert (Page Break, Cover Page, Table, Shapes, Header+Footer, Text Box, Equations, Symbols)Design (Themes, Colors, Fonts)Layout (Page Setup, Indent and Spacing)References (Table of Contents, Footnotes, Citations)
Basic Formatting:
Change Font Size:
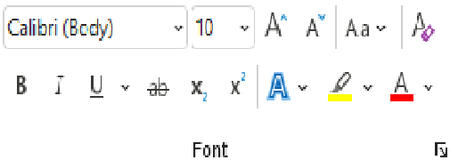
1) Left click the Home tab and in the Font section, you will see a font size box.
2) You can change the font size manually by typing in the font size you want or you can choose the provided font sizes by left clicking on the downward pointing arrow.
Change Font:
1) Left click the Home tab and in the Font section, you will see a Font rectangular box.
2) Left click the downward pointing arrow provided for that box and choose the Font you want.
Make text bold:
1) Left click the Home tab and highlight with your mouse the text you want to make bold.
2) Left click the ‘B’ in the Font section of the Home tab.
Make text italic:
1) Left click the Home tab and highlight with your mouse the text you want italic.
2) Left click the ‘I’ in the Font section.
Underline text:
1) Left click the home tab and highlight with your mouse the text you want underlined.
2) Left click the underlined ‘U’ in the Font section.
Cross text:
1) Left click the Home tab and highlight with your mouse the text you want to cross.
2) Left click the crossed ‘ab’ in the Font section.
Subscript:
1) Left click the Home tab and highlight with your mouse the letters or words you want as subscript.
2) Left click the corresponding X2 in the Font section.
Superscript:
1) Left click the Home tab and highlight with your mouse the letters or words you want as subscript.
2) Left click the corresponding X2 in the Font section.
Change Case:
1) Go to the Home tab and highlight with your mouse the text whose case you want to change.
2) Left click ‘Aa' in the Font section and any of the given options to change the case to specifically what you want.
Clear Formatting:
1) Left click the Home tab.
2) Then, highlight the text with your mouse you want to remove all formatting from
3) Next, in the top-right corner of the Font section, click the button that the letter ‘A’ and an eraser.
Text highlight color:
1) Left click the Home tab.
2) Then, highlight the text with your mouse you want to change highlight color for.
3) Next, in the Font section, click the downward pointing arrow in the ‘Text Highlight color.’
4) Choose the highlight color.
Font color:
1) Left click the Home tab and in the Font section, you will see ‘Font Color’ at the bottom right.
2) Left click the arrow provided next to it.
3) Choose the Font color.
Bullets:
1) Highlight with your mouse the text you want bulleted.
2) Left click the Home tab and in the paragraph section, you will see Bullets in the top left part.
3) Click the arrow next to it to choose how you want your bullets to look like.
Numbered list:
1) Highlight with your mouse the text you want numbered.
2) Left click the Home tab.
3) In the paragraph section, click the downward pointing arrow next to ‘Numbering’.
Line and paragraph spacing: 1) Highlight the paragraph or text you want to change the line and paragraph spacing for with your mouse.
2) Left click the Home tab.
3) In the paragraph section, left click ‘Line and Paragraph Spacing’.
4) Select from the given options what you want.
Header and Footer:
1) Left click the insert section and in the ‘Header & Footer’ section, you will see ‘Header’ and ‘Footer’ separately.
2) Left click on either one of those you want to insert.
3) Choose from the given options how you want your Header or Footer to look like.
Orientation:
1) To change orientation, left click with your mouse the Layout tab and you will see ‘Orientation’ in the ‘Page Setup’ section.
2) Change the orientation to either ‘Portrait’ or ‘Landscape’ depending on what you want.
Tip: If something unexpected happens with the F1, F5, F7, F12 keys, try holding down the FN keys while pressing the other keys—if your keyboard has one.
Helpful Links:
Keyboard Shortcuts
collaborating with others in word

How to Share Documents With Others:
1) You can share a document to others by clicking on the File tab on the left hand corner of the screen.
2) Next, scroll down to the share option on the left side then click on it.
3) A new window will open giving you several options of sharing.
4) You may either upload it to OneDrive or attach it as a Word document or PDF.
How to Invite Others for Co-Edit:
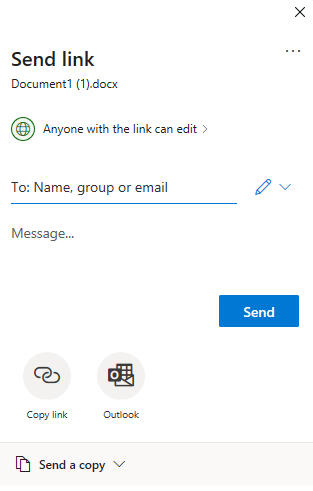
In order to have others work on the same document as you, you can send them a link to the document.
1) First, follow steps 1 and 2 from the Sharing section above.
2) Then, select who can have access to the document by clicking on the section next to the green circular icon. You can set link permissions to anyone with the link or to specific people. You can also choose whether to allow editing, and you can set expiration dates and a password for the link.
3) Click on Apply when you’re done, and it will lead you back to the previous window.
4) Next, you must enter the name, group, or email of the user(s) you are sharing the document with. Select whether they can edit or view the document by clicking on the drop down menu next to the users’ text box.
5) Once you are done, click on the blue Send button and your sharable link is ready for use!
